Flora & Flutter by Paper Pumpkin

I finally made some time to play with my December 2017 Paper Pumpkin kit – Flora & Flutter.  Just as the name suggests, the project involves flowers and butterflies and the promise of Spring soon to follow.

The contents of this kit included supplies to make 8 cards – 4 each of 2 different designs.  One I loved as it was designed; however, the other one made me dizzy with one of the elements so after contemplating the ventilated peachy die cut, a spark of creative genius took light.  Here are my cards:

On the Calypso Coral and Peekaboo Peach card I cut out the first, third and fifth  strips from the vented die cut and weaved them in from the opposite sides to create a trellis-like die cut and then layered the pieces per the directions.

Here is the official YouTube video that shows the contents of the kit and what the unaltered card should have looked like:

If you like the December 2017 kit and are not yet a Paper Pumpkin subscriber, there is a refill kit being offered for $8.00.  While the refill kit will not include the stamp set and stampin’ spot (ink), it will include all of the other supplies you need to create cards similar to mine.  All you need to do is subscribe to Paper Pumpkin to qualify to purchase past kits and refills while supplies last.  A showcase of available past kits is below for your convenience and reference.

Earn FREE stuff during Sale-A-Bration!  Here is what you can earn with a prepaid subscription to Paper Pumpkin:

Still not convince you should give Paper Pumpkin a try?

  • Sale-A-Bration is the only time you can earn free Stampin’ Up! products for joining Paper Pumpkin.
  • Prepaids are already such a great deal!  How can you pass them up when you get FREE items, too?
  • Overwhelmed by all of the choices in the catalog?  The easiest way to earn Sale-A-Bration rewards is by purchasing a prepaid subscription.
  • Want to earn more than one Sale-A-Bration item?  Sign up for a 6- or 12-month subscription.  With a 12-month subscription, you can earn up to four Sale-A-Bration items (plus host benefits)!
  • Now is the best time to try Paper Pumpkin.  Sign up, grab free Sale-A-Bration items, and get months of papercrafting bliss!
  • Already subscribed?  Buy a prepaid subscription as a gift to earn free Sale-A-Bration product(s).
  • Are you a former Paper Pumpkin customer?  Now’s the perfect time to sign up again!  Because you can get Free Sale-A-Bration items when you come back with using a prepaid subscription.
  • New to crafting?  Paper Pumpkin is a quick and easy way to learn this fun skill.  And when you join during Sale-A-Bration, you get a fantastic bonus: FREE Stampin’ Up! product(s)!

If you are still not convinced, let me know if I can answer any questions.

Thank you for stopping by today.  I hope you leave here inspired to put stamps to ink to paper.  Until next time, stamp on my friends.

Linda

A Note from Stampin’ Up! Corporation Office Re: Picture Perfect Paper Ribbon

At the end of November, the Picture Perfect Paper Ribbon (145502) was classified as unavailable for demonstrator preorder due to environmental audits halting production of thousands of factories across China. Unfortunately, Stampin’ Up!—along with many other businesses worldwide—have continued to experience delays in production. As a result, Stampin’ Up! has  decided the best course of action for our customers and our company is to remove this item from our product offering.

We know many of you—just like us—were eagerly anticipating the release of this product. We want you to know how sorry we are about this turn of events. Although Picture Perfect Paper Ribbon won’t be available, we have some good news: We’ve got many other ribbons that are available. With your creative minds, we know you’ll still be able to create the perfect card!

Thank you for your continued patience and understanding.

Posted in Any Occassion, Birthday, Cards, Paper Pumpkin, Sale-A-Bration | Tagged | Leave a comment

Color Me Happy for a Picture Perfect Birthday

Guess what?  I am using my Stampin’ Blends in today’s project.  I just can’t help myself.  I always loved coloring as a youngster and it appears I never outgrew it!

I have combined two stamp sets that really have absolutely nothing to do with each other, but this is just one example of how versatile these stamp sets can be – one just needs to think “outside the box” a bit to see where your craftiness will take you.  This is where mine took me today:

The Color Me Happy stamp set is part of the Color Me Happy Bundle that was released with the introduction of the new alcohol markers from Stampin’ Up! –  Stampin’ Blends.  The bundle includes the stamp set and a project kit that makes 16 cards (4 each of 4 designs).  I did not purchase the bundle, but the stamp set was a must have for me because of the two birds and those cute paper lanterns.  My project today was inspired by one of the cards from the kit.

Here are the Stampin’ Up! products that were used in the design of this card all of which can quickly be added to your shopping cart by clicking on the thumbnails below:

To make the card front, the DSP is cut to 4.00″ x 5.25″ and the Whisper White cardstock is cut to 3.25″ x 5.00″.  All of the paper lanterns are stamped in Memento Tuxedo Black ink directly onto the Whisper White cardstock and one of the round lanterns is stamped also on a scrap piece of Whisper White and then fussy cut and attached on top of stamped lantern with dimensionals.

If you need further instructions as to the design of this card do not hesitate to leave me a comment or email me.  I will be more than happy to answer any questions you may have.

Thank you for stopping by today.  I hope you leave here inspired to put stamps to ink to paper.  Until next time, stamp on my friends.

Linda

Posted in Any Occassion, Birthday, Cards, New Arrivals, Occasions Catalog | Tagged , , | Leave a comment

Bubble Over for a Picture Perfect Birthday

Happy New Year to you all.  I spent the last few days watching Harry Potter marathons and Game of Thrones marathons with my grandson and husband.  My grandson was so determined to make it through the last Harry Potter movie on HBO last night that he stayed up with me until 3:45 A.M.  It was a struggle on his part but he made it!

How excited are you that the Occasions Catalog is now live and that you can now earn a FREE item from the Sale-A-Bration brochure with every $50 (Level 1) or $100 (Level 2) purchase (before taxes and shipping)?!?  I am super excited myself.  I can now bombard you with projects using these fantastic new products without feeling bad that you can’t buy them yet.

For today’s project, I used two stamp sets from the Occasions Catalog and some designer series paper that I got FREE from the Sale-A-Bration brochure that just happens to coordinate with one of the stamp sets.  Without further delay, here is today’s card:

So have you tried the 2017-2019 In Color Lemon Lime Twist yet?  It is definitely one of those colors that you  have to have in your hands and use in person to truly appreciate the color.  I admit at first I did not care for it, but once I had the opportunity to use it I fell in love and just had to have it.  Give it a try if you haven’t I promise you will not be disappointed.

NOTE:  The Bubble Over stamp set has a coordinating framelit dies set, Bottles & Bubbles.  You can purchase both as a bundle and save 10% off their prices if you purchase them separately.  Both options have been provided in the showcase above.

Here are the Stampin’ Up! products that I used in the design of this card which can quickly be added to your shopping cart by clicking on the thumbnails below:

The base of my card is Lemon Lime Twist cardstock cut at 5.50″ x 8.50″, then scored at 4.25″.  The Whisper White layer is cut at 4.00″ x 4.00″ and the strip of Designer Series Paper is cut at 4.00″ x 1.50″.  The DSP is adhered on top of the Whisper White piece overlapping by .25″ so that the assembled piece measures 4.00″ x 5.25″, which is attached to the card base with snail.  The greeting, bottles and candles are attached to the card front with mini dimensionals.

If you have any other questions regarding the design elements of this card, do not hesitate to contact me.

Thank you for stopping by today.  I hope you leave here inspired to put stamps to ink to paper.  Until next time, stamp on my friends.

Linda

Posted in Birthday, Bundles, Cards, New Arrivals, Occasions Catalog, Products, Sale-A-Bration | Tagged , , | Leave a comment

Lots of Lavender to Celebrate You

I have to confess that I am having way too much fun with my Stampin’ Blends!  I want to use them on every project I make and thankfully the Occasions Catalog and Sale-A-Bration flyer have plenty of stamp sets to choose from that allow for some adult coloring!

For today’s project I used two stamp sets from the Sale-A-Bration offerings – Amazing You and Lots of Lavender.  The Lots of Lavender stamp set is actually a two-step stamp set which means it has line art stamps and then a coordinating watercolor effect stamp that would “color” the stamped line art for you; however, since I wanted to use my Blends, I skipped the second step.  And here is today’s card:

One thing I wish I could change about this stamp set would be to have the ribbon on the bouquet to be a separate stamp.  I really wanted to have these bouquets of lavender flowers hanging upside down from twine, but the ribbon and bow would have been in the wrong direction.  I will need to experiment on how I can mask out that bow …

Here are the Stampin’ Up! products that I used in the design of this card which can be added to your shopping cart with a quick click on the thumbnails below:

To create the stitching at the top and bottom of the card front I used the long dotted die from the Swirly Snowflakes Thinlits.  I then threaded one strand of the burlap ribbon through a needle and worked the ribbon through the holes securing the loose ends on the back with scotch tape.  I used two strands to make a bow which I attached to the front with liquid glue and I curled the ends with my bone folder until they were curly.  The card front is attached to the card base with dimensionals.

If you have any other questions regarding the design elements of this card, do not hesitate to leave me a comment or email me.  I am happy to be of assistance.

Thank you for stopping by today.  I hope you leave here inspired to put stamps to ink to paper.  Until next time, stamp on my friends.

Linda

Posted in Any Occassion, Cards, New Arrivals, Products, Sale-A-Bration | Tagged , | 1 Comment

Cake Soiree Eclipse

Today I opened up one of my favorite product suites from the upcoming Occasions Catalog – the Sweet Soiree Suite.  This would be considered to be a “mega” suite since there are so many bits and embellishments that coordinate with the stamp set and incredibly amazing designer series paper.

Today’s project uses four elements from the suite – the stamp set, coordinating framelits, designer series paper and metallic-edge ribbon.  Without further delay, here is today’s card project:

This is another “eclipse” card – the double layered cake was stamped onto the Very Vanilla cardstock and then cut out with the framelit.  I then added dimensionals to the back of the cut-out and placed it back into the area where it was cut from.  I just love this technique and one day hope to scrape together enough money to get me a set of the large letter dies so I can do word eclipse cards.

Here are the Stampin’ Up! products that were used in the design of this card which can be added to your shopping cart with a quick click on the thumbnails:

I stamped the cake in Memento black ink and then colored the flowers and leaves with my Stampin’ Blends.  I added Clear Wink of Stella to the colored flowers and leaves which gives the card a nice shimmery look when the light hits it just right.

If you have any other questions regarding the design elements of this card, do not hesitate to leave me a comment or message me for more information.  I am happy to be of help.

Thank you for stopping by today.  I hope you leave here inspired to put stamps to ink to paper.  Until next time, stamp on my friends.

Linda

Posted in Any Occassion, Cards, New Arrivals, Occasions Catalog, Techniques | Tagged , , | Leave a comment

Heartfelt Blooms for Sale-A-Bration

It is time to put away the Christmas stamp sets and designer series papers and make room on my craft table for the new and exciting products coming soon when the Occasions Catalog and Sale-A-Bration go live on January 3, 2018.

For today’s project I chose a stamp set from the Sale-A-Bration brochure which is available for FREE after you purchase $50 in other Stampin’ Up! products (before tax and shipping).

NOTE:  The floral image on this stamp set is a new style of stamp called “Distinctive”* – the stamp lays down the ink at different opacities giving the finished image more depth.  Just ink the surface lightly for a perfect photographic finish (*Patent pending).

Without further delay, here is today’s finished card:

Now you may be thinking “that looks a little weird”, but it is actually just the technique that I chose to use which was demonstrated at OnStage in November.  I stamped the floral image in Smoky Slate and allowed it to dry completely.  I then selected some of my Stampin’ Blends alcohol markers and colored areas of the stamped image to bring out the flowers and leaves.  Once I was done I applied a coat of Clear Wink of Stella to the entire stamped image and using my Layering Ovals Framelits I cut out the image and created an “Eclipse” card by attaching the cutout to the card front with dimensionals over the area where the oval was cut from.

Here are the Stampin’ Up! products that I used in the design of this card which can quickly be added to your shopping cart by clicking on the thumbnails below:

If you have any other questions regarding the design of this card, do not hesitate to leave a comment or send me an email.  I am always happy to help.

Stamparatus Reservation Window Closes December 30, 2017

If you want to get Stampin’ Up!’s new stamp placement tool before it becomes available in June 2018 with the release of the new Annual Catalog, be sure to go online to stampinup.com to reserve yours before 11:59 PM (MT) on December 30, 2017.  You will need to have an online account to make your reservation and will be required to enter a credit card (or debit card) number; however, your card will not be charged until the tool ships in mid-March.  You will receive an email from Stampin’ Up! to notify you to complete your order when inventory has been received at the distribution center.

Year-End Sales Event

If you still have items from the Holiday Catalog on your wish list that are not on the Carryover list, you have until January 2, 2018 to place your order.  Keep in mind that items included as part of this event are available only while supplies last.  Some items have been discounted so be sure to check out the Event lists.  (Links are provided in the right margin of my blog.)

Thank you for stopping by today.  I hope you leave here inspired to put stamps to ink to paper.  Until next time, stamp on my friends.

Linda

Posted in Any Occassion, Cards, New Arrivals, Sale-A-Bration | Tagged , | 1 Comment

Elf Hats Galore

It is time for me to share with you my next Christmas project (and sadly my last for the season). I made six elf hats that I filled with assorted chocolates and a rolled up $20 bill for each of my four nieces who live nearby. I also gave one to my Mom with a few more $20’s inside and put one in my husband’s stocking from “Santa”. I got the project design idea from the fabulous Connie Stewart and I posted an early project making an alternate project – a Christmas Tree. Without further ado, here is a photo of the elf hats.

Here are the Stampin’ Up! products that I used in the design of this project which can quickly be added to your shopping cart by clicking on the thumbnails below:

If you need instructions on how to make one of these elf hats and you cannot find my prior post (or you simply do not want to look for it) just ask. I would be happy to help.

Thank you for stopping by today. I hope you leave here inspired to put stamps to ink to paper. Until next time, stamp on my friends.

Linda

Posted in 3-D Projects | Leave a comment

Merry Christmas! – Take 2

My apologies to everyone who tried to link to my post from yesterday.  Something went wrong and I took it down after I posted it.  Redoing it again today at my laptop rather than my iPad!

I hope you all had the opportunity to spend some quality time with your family to celebrate Christmas. The older I get the more I cherish the times when my sisters and I can get together under one roof with our Mom. I have three sisters – one who is almost four years older than me, one that is two years younger and the third is three years younger. The one closest to my age has four daughters of her own, the youngest is a Sophomore in High School, and our Christmas Eve gathering shenanigans could have come from a page from our own childhood. I haven’t laughed so hard in a long time listening to tales of “isn’t that my sweater” and “well isn’t that my necklace” … teenage girls are a hoot. As a teenager I had to resort to putting a lock on my bedroom door to keep my youngest sister from wearing my underwear!

I made my Mom and three sisters calendars modeled after the “One Great Year” Paper Pumpkin Kit that I shared with you in an earlier post. For these calendars I tried to select designer series paper that would go along with the seasons for the months (or at least how those seasons typically should be like – since here in Texas we generally have just two seasons, Summer and Winter). Here is what I ended up with:

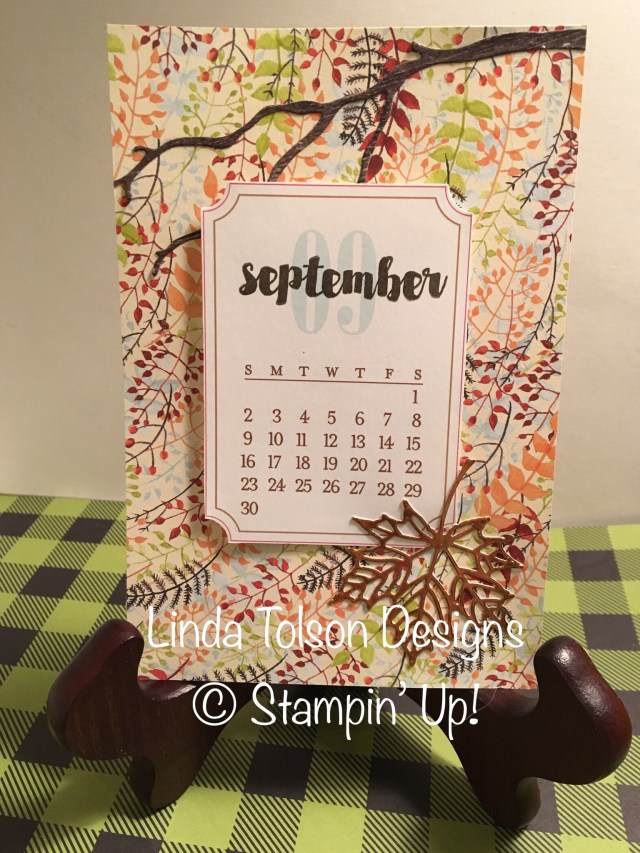
Here are the Stampin’ Up! products that I used in the design of these calendar pages which can quickly be added to your shopping cart by clicking on the thumbnails below. (NOTE: Some of the products used in this project are only available through January 2, 2018 as part of the Holiday Catalog Year-End Sales Event.)

I used some retired items on these calendars (Itty Bitty Butterfly Punch, Blushing Bride Glimmer Paper, and the heart punch from Itty Bitty Accents trio punch set).  The stamp set for the months by name is from a 2015 Paper Pumpkin kit called “One Great Year”.

HERE is the link for the printable PDF for the 2018 calendar by month.  You may need to adjust your printer settings to get a higher quality printed document (I changed my settings to “Best” and increased the darkness a little).

Since these calendars were gifts I needed to make some boxes that were appropriately sized. This is one instance where I actually applied some of my math skills I learned in school (whoever says you never use math IRL is wrong). Each page of the calendar measures 4″x6″.  I quickly calculated in my head that an 8.5″x11″ piece of cardstock scored at 2″ on all four sides would result in a box roughly 4.5″x7″ – perfect for my needs.

The best cardstock to use for a box bottom is either Thick Whisper White or Thick Very Vanilla. Once all four sides have been scored at 2″ fold and burnish the score lines with your bone folder. Then using paper snips cut up to the first score line on each end on both side to create tabs that will fold in and attach to the inside flaps to form you box.I used some retired thicker kraft paper designer series paper for my box top. I cut the 12″x12″ piece down to 8.5″x11″ and scored all four sides at 1-15/16″ and then folded, burnished and cut tabs the same as I did to make the bottom. The top will fit perfectly over the bottom if you cut and scored as indicated.

I tied some retired ribbon around the top of the box and then wrapped the bottom on the box with retired washi tape. I created the tags from the 6″x6″ Christmas Quilt Designer Series Paper which I cut into 3″x6″ strips and cut at one end with the banner triple punch and at the other with the scallop tag punch.

Here are the Stampin’ Up! products that I used in the design of these boxes which can be quickly added to your shopping cart by clicking on the thumbnails below:

I also used retired products on this project (Under the Tree Specialty Designer Series Paper, Stitched Edge Ribbon in Real Red and washi tape).

That is all I will share with you today. I have one more project that I will share with you tomorrow that I used as stocking stuffers. Stay tuned.

Thank you for stopping by today. I hope you leave here inspired to put stamps to ink to paper. Until next time, stamp on my friends.

Linda

Posted in 3-D Projects, Holiday Catalog | Leave a comment

Clearance Rack Refresh

New items have been added to the Clearance Rack in the online store (including Curvy Keepsake Box die)!

Supplies are limited, and with discounts up to 70%, products will go quickly. Shop now and stock up.

Click HERE for a link to the Clearance Rack.

Thank you for stopping by. Until next time, stamp on my friends!

Linda

UPDATE: Within the last 15 minutes the Curvy Keepsake Box die sold out. Just a prime example of the old saying “you snooze, you lose.” 😟

Posted in Clearance Rack | Leave a comment

Running Out of Time

You may have noticed that I have not posted in at least a week. Don’t worry as all is well, I am just short on time for all that I need to accomplish before December 25. I am sure I am not the only person in this situation.

I am happy to say that I finally completed my Christmas cards – 52 handmade cards were posted on Saturday and I have my fingers crossed that they will all be received by the addressees before Christmas Day.

I am now working on some handmade gifts for a few friends, my sisters and of course my Mom. So until I complete those goals I will not be posting daily projects. However here is a photo of my desk which gives you a sneak peek of the Tutti-Frutti Suite in the 2018 Occasions Catalog (Fruit Basket Bundle #145977 $35.00), available on January 3, 2018.

Those are teeny tiny pears! Also included in the 4-Punch set is a strawberry, a pineapple and a watermelon (or any fruit slice actually depending on your color choices when stamping). This bundle is adorable.

Speaking of running out of time, the Year-End Sales Event ends on January 2, 2018. This event coincides with the final sale date of the items in the Holiday Catalog. The majority of the items in the Holiday Catalog are being retired and will not be available for purchase after January 2nd. Don’t start off the New Year filled with regret because you didn’t grab those products you wanted or needed now before they are gone for good! Visit my online store and get started. If you need help, just ask!

Thanks for stopping by today. Until next time, stamp on my friends.

MERRY CHRISTMAS!

Linda

Posted in Bundles, Christmas, Products | Tagged | Leave a comment