
My apologies to everyone who tried to link to my post from yesterday. Something went wrong and I took it down after I posted it. Redoing it again today at my laptop rather than my iPad!
I hope you all had the opportunity to spend some quality time with your family to celebrate Christmas. The older I get the more I cherish the times when my sisters and I can get together under one roof with our Mom. I have three sisters – one who is almost four years older than me, one that is two years younger and the third is three years younger. The one closest to my age has four daughters of her own, the youngest is a Sophomore in High School, and our Christmas Eve gathering shenanigans could have come from a page from our own childhood. I haven’t laughed so hard in a long time listening to tales of “isn’t that my sweater” and “well isn’t that my necklace” … teenage girls are a hoot. As a teenager I had to resort to putting a lock on my bedroom door to keep my youngest sister from wearing my underwear!
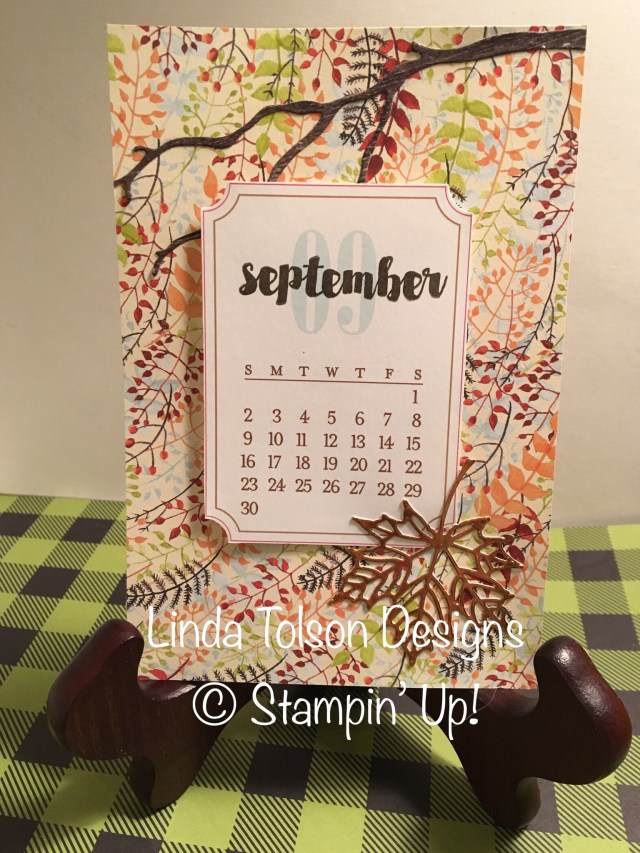
I made my Mom and three sisters calendars modeled after the “One Great Year” Paper Pumpkin Kit that I shared with you in an earlier post. For these calendars I tried to select designer series paper that would go along with the seasons for the months (or at least how those seasons typically should be like – since here in Texas we generally have just two seasons, Summer and Winter). Here is what I ended up with:


 Here are the Stampin’ Up! products that I used in the design of these calendar pages which can quickly be added to your shopping cart by clicking on the thumbnails below. (NOTE: Some of the products used in this project are only available through January 2, 2018 as part of the Holiday Catalog Year-End Sales Event.)
I used some retired items on these calendars (Itty Bitty Butterfly Punch, Blushing Bride Glimmer Paper, and the heart punch from Itty Bitty Accents trio punch set). The stamp set for the months by name is from a 2015 Paper Pumpkin kit called “One Great Year”.
HERE is the link for the printable PDF for the 2018 calendar by month. You may need to adjust your printer settings to get a higher quality printed document (I changed my settings to “Best” and increased the darkness a little).
Since these calendars were gifts I needed to make some boxes that were appropriately sized. This is one instance where I actually applied some of my math skills I learned in school (whoever says you never use math IRL is wrong). Each page of the calendar measures 4″x6″. I quickly calculated in my head that an 8.5″x11″ piece of cardstock scored at 2″ on all four sides would result in a box roughly 4.5″x7″ – perfect for my needs.

The best cardstock to use for a box bottom is either Thick Whisper White or Thick Very Vanilla. Once all four sides have been scored at 2″ fold and burnish the score lines with your bone folder. Then using paper snips cut up to the first score line on each end on both side to create tabs that will fold in and attach to the inside flaps to form you box.I used some retired thicker kraft paper designer series paper for my box top. I cut the 12″x12″ piece down to 8.5″x11″ and scored all four sides at 1-15/16″ and then folded, burnished and cut tabs the same as I did to make the bottom. The top will fit perfectly over the bottom if you cut and scored as indicated.
I tied some retired ribbon around the top of the box and then wrapped the bottom on the box with retired washi tape. I created the tags from the 6″x6″ Christmas Quilt Designer Series Paper which I cut into 3″x6″ strips and cut at one end with the banner triple punch and at the other with the scallop tag punch.
Here are the Stampin’ Up! products that I used in the design of these boxes which can be quickly added to your shopping cart by clicking on the thumbnails below:
I also used retired products on this project (Under the Tree Specialty Designer Series Paper, Stitched Edge Ribbon in Real Red and washi tape).
That is all I will share with you today. I have one more project that I will share with you tomorrow that I used as stocking stuffers. Stay tuned.
Thank you for stopping by today. I hope you leave here inspired to put stamps to ink to paper. Until next time, stamp on my friends.
Linda


