Hello Sunshine & Something New

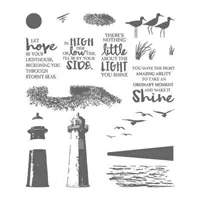
Happy Monday.  Ugh, okay I’m with you — Mondays can be the pits.  The weekend is over and your 9 to 5 job (which is more like 8 to 6) awaits.  To help put a little “sunshine” in your day on this very cloudy and rainy day here in the Dallas Metroplex, I am sharing with you three cards that I made using an old Paper Pumpkin kit.  I am not sure just how old it is since it did not have a date on it, but I am guessing about May 2016 or so.

The kit is called Hello Sunshine and I have to say hands down it is my favorite kit I have worked on so far.  There were three card designs with enough supplies to make three of each design.  Here they are:

I did not change the design of these cards — I followed the instructions just as written as I thought they were perfect.  I just wish I could get my hands on more of these supplies … but alas they are gone, gone, gone.

But never fear, there is a new kit each month and if you subscribe to Paper Pumpkin before June 10, you will save 25% off the first three months.  This offer is available to new subscribers only and is not available for pre-paid subscriptions.  Visit paperpumkin.com for more information.  And don’t forget to select me as your demonstrator when you subscribe!

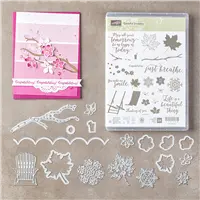
Introducing the Color Theory Suite

For those of you familiar with Stampin’ Up!, you will have noticed over the past several years their catalog has been broken down into product categories referred to as “suites”. Below is a video from the Home Office that introduces you to one of the new suites from the 2017-2018 Annual Catalog — Color Theory.

Your local Home Depot and Lowes stores will be thankful to Stampin’ Up! for coming out with their own Designer Series Paper in the form of paint chips — you know you’ve sticky fingered your share of those things to use on cards!

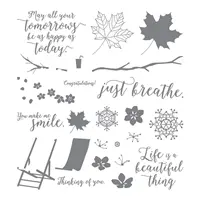
I absolutely love this suite.  So versatile and coordinates well with so many other sets in the Annual Catalog.  Keep your eyes out for upcoming samples I make using these products.  You can also see the Adirondack chair thinlit used on my “Just Breathe Beautiful You” card I posted a few weeks ago.

Thank you for stopping by today.  I hope you leave here inspired to put stamps to ink to paper.  Until next time, stamp on my friends.

Linda

Posted in Birthday, Cards, Congratulations, Paper Pumpkin, Products, Suites, Thank You | Leave a comment

Happy National Donut Day!

Is it just me, or does it seem like we celebrate just about anything here in the United States?  Well, I for one LOVE donuts and would celebrate them every day if I could, but I know that they are not good for me so I only allow myself to enjoy one every once in a while.

Speaking of donuts — one of my many nieces (did you know I have 8!) graduates from Denton Ryan High School today.  She will be heading off to the University of North Texas this Fall.  In her graduation announcement there was a picture of her eating a donut with the caption “Donut know how … but I am graduating …”

(Sorry, my “puppy” Ella’s jaws of doom found the announcement.)

(But with those sweet brown eyes you can’t really stay mad at her for too long.)

I am a big punster myself and got a big laugh out of that one.  Then just a week or so later my May Paper Pumpkin kit arrived in the mail.  If you have not already heard and/or are not a monthly subscriber, the theme of the month was DONUTS!  I knew I had to make her a graduation card with this kit.

The stamps on the front and bottom inside are from another set, but everything else is from the May Paper Pumpkin kit.  You cannot tell from the photo, but I also added swipes of Clear Wink of Stella to the “chocolate swirls” so the card front shimmers when you move it.  The kit also included brown “bags” for envelopes.  We slipped the card in with some cash to complete our gift to her.

Here is the video for the May Paper Pumpkin Kit so that you can see the many different designs and options that can be made with the supplies.  There is also a website you can join once you become a subscriber which gives you “alternative” designs if you want to think “outside the box.”

I have seriously neglected my Paper Pumpkin kits and have begun to work on putting many of them together since they are quick and easy projects (they are designed to be completed in an hour or less).  So be on the lookout for more quick and easy projects from me soon.

There is still time to sign up to receive the June Paper Pumpkin kit AND receive the 25% discount for the first 3 months for NEW subscribers.  DEADLINE IS JUNE 10.  You can get more information by visiting my prior post HERE.  If you need help subscribing (and if you subscribe I hope you will consider selecting me as your demonstrator), just ask — I am here to help!

Thanks for stopping by today.  I hope you leave inspired to put stamps to ink to paper.  Until next time, stamp on my friends.

Linda

Posted in Cards, Graduation, Paper Pumpkin, Promotions | Leave a comment

Creativity Your Way – Introducing the New Annual Catalog!

It’s finally here my friends.  The opening day of the 2017-2018 Annual Catalog!  (Ordering officially opened at 2:00 pm (MT) today.)  To help prepare you for all the greatness there is to see this year, here is a short video from the Stampin’ Up! home office:

If you do not already have a copy of the new Annual Catalog, let me know and I will happily send one your way.

Sadly the new Daisy Punch (Item # 143713  $18.00) was such a popular item following OnStage in April and the Demonstrator pre-order period in May all 10,000 punches of the initial quantity order have sold out, with 7,200 selling in just two weeks.  It is an AMAZING punch — I had the chance to use it at OnStage, but did not include it as part of my pre-order.  Now I wish I had.  A new supply has started production but they are not expected to be available until late June or early July.  Therefore, the Daisy Punch and the Daisy Delight Bundle are currently in “not orderable” status.  You can still purchase the coordinating stamp set and the Designer Series Paper, both of which are pretty awesome as well.

I will plan on sharing with you at least one new product video over the next few days.  I also hope to have some new cards or other projects to share since the weekend is approaching and I will have more time to get creative.

Thanks for stopping by.  Until next time, stamp on my friends.

Linda

Posted in Products | Leave a comment

Last Chance to Buy Retiring Products

Today is the absolute last day you can buy products from the 2016-2017 Annual Catalog and the 2017 Occasions Catalog that appeared on the Retired Items list beginning April 10. (As a reminder, all items on the retired list were “while supplies last” so a vast amount of those items have since sold out and are no longer available.)

For your convenience, below are quick links to the remaining items that are available through 11:55 PM (MT) if order is placed online, or 6:50 PM (MT) if order is place by phone.

Don’t regret not getting that stamp set or framelit/thinlit you have been eyeing for months.  There is no tomorrow when it comes to these products.  If I can be of any assistance in getting your order started for you, just call or email me ASAP!

Thanks for stopping by.  Until next time, stamp on my friends.

Linda

Posted in Products, Retired / Clearance Rack Items | Leave a comment

Punch Art Giraffe in a Shadow Box

Hello my friends.  I hope you have had an enjoyable Memorial Day weekend so far.  I had one of my IGA infusions  a week ago Friday and was down and out for a week afterwards so I am taking it easy this weekend.  (Very frustrating when I had zero side effects after the one prior.  One step forward, two steps back.)

I finally felt up to doing something creative by Friday evening and started working on a shadow box project to celebrate the birth of an adorable baby girl by my infusion nurse, Ariellen.  She was placed on bed rest during the last few months of her pregnancy and she spent a lot of that time following the live feed of April the giraffe in anticipation of seeing the birth of her baby giraffe.  This experience influenced a “jungle theme” for the nursery, with lots of giraffes.

Well, I wanted to make a wall hanging that would fit in with the theme, but I didn’t have any giraffe stamps so I went to Pinterest to see what I could make using punch art.  I am always amazed by the creativity of  my fellow crafters.  My giraffe was inspired by a combination of projects that I saw (credit given below).  And here is my punch art giraffe:

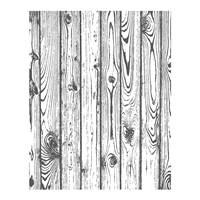
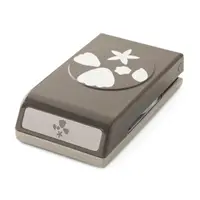
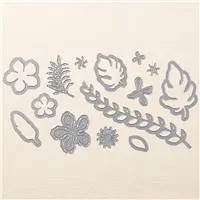
I used several retired products and tools to get the look that I wanted, as well as some that are retiring as of May 31, 2017.  Here is a list of what I used to create this project:

  • Sweet Pea Designer Series Paper (Item #117161 – retired)
  • Ovals Collection Framelits (Item #129381 – retired)
  • Word Bubbles Framelits (Item #132968 – retired)
  • Little Letters Thinlits (Item #133730 – retired)
  • 2-1/2″ Circle Punch (Item #120906 – retired)
  • Large Oval Punch (Item #119855 – retired)
  • Basic Pearl Jewels (Item #119247 – retired)
  • Glimmer Paper Assortment Pack (Item #143831 – retired)
  • 12 x 12 Shadow Box (not sold by Stampin’ Up!)

Inspired by:  Baby Giraffe card by Lisa Fisher (May 2, 2o11); and Giraffe card for Alex by irishgreensue on splitcoaststampers.com.

If you want to try and create a similar punch art giraffe, here are the punches that I used for each of the body parts:

Head:  Owl Builder Punch – body without feet.
Eyes:  Owl Builder Punch – whites:  the two medium size circles that are above the body on the punch; pupils:  the two smallest circles that are on the far side of the punch beneath the “vest” or “chest” piece.
Ears:  Blossom Builder Punch:  leaf x 2 in So Saffron and Soft Suede.  Cut down the Soft Suede as shown.  I attached So Saffron to back of Owl ear and Soft Suede on front on top of Owl ear.
Nostrils:  Owl Builder Punch – the two medium size circles that are above the body on the punch.
Mouth:  Blossom Builder Punch – the leaf; Owl Builder Punch – medium size circle for the tongue.
Antlers:  Free hand; Owl Builder Punch – medium size circles.
Neck:  Free hand; Owl Builder Punch – medium size circles; 1/2″ Circle Punch.
Body:  Oval Framelit.
Tail:  Free hand.
Legs & Hoofs:  Free hand; 1/2″ Circle Punch, cut in half.

Sun & Rays:  2-1/2″ Circle Punch; Blossom Builder Punch – 2 petals from the 5-petal flower.

Clouds:  Word Bubbles Framelits – overlaid Whisper White with vellum to mute color.

Flowers:  Succulent Framelits – blue and orange flower; Botanical Builder Framelits – pink flower.

I had originally attempted to sponge in some Soft Sky at the top but did not like how it turned out, so instead of overlaid some light blue designer series paper to represent the sky.  All in all I am happy with how this turned out — not too bad for my first punch art animal.

Thanks for stopping by.  I hope you leave here inspired to create your own punch art.  Until next time, stamp on my friends.

Linda

Posted in 3-D Projects, Big Shot, Home Decor | Leave a comment

Just Breathe Beautiful You

Greetings!  I really let my inner-artist flag fly high when I was working on my latest card design this week.  I have been so inspired by the many creations my fellow demonstrators have shared using two must have stamp sets from the 2017 Occasions Catalog that are — thankfully! — carrying over to the 2017-2018 Annual Catalog.  Can you guess which two stamp sets I am referring to?  Well, they would be High Tide and Beautiful You, of course!

While at OnStage Local back in April we were given a sneak peek at a few of the new stamp sets and framelit/thinlit bundles that are being offered in the 2017-2018 Annual Catalog, and my favorite that coordinates perfectly with High Tide and Beautiful You is the Colorful Seasons stamp set and the Seasonal Layers Thinlits (both available starting June 1, 2017 and offered as a bundle!).

This type of card design really steps outside of my comfort zone as it involves the use of  a watercolor technique and masking, but I am rather pleased (and shocked) with how well it turned out.  Listed below are the Stampin’ Up! products I used, followed by step by step instructions on how you can recreate this card on your own.

Price: $110.00

* Not available for purchase until June 1, 2017.

Card Base:  Marina Mist Card Stock cut to 5.5 x 8.5, scored at 4.25
Mat:  Basic Black Card Stock cut to 5.35 x 4.15 (approximately)
Top Layer:  Whisper White Card Stock cut to 5.25 x 4.00

First I stamped the girl from the Beautiful You stamp set using a Tuxedo Black Memento Ink Pad onto the Whisper White Card Stock.  She is watercolored using the Melon Mambo pencil from the assortment pack and Aqua Painter.  (I cheated a little and used one of my skin-tone Blendabilities® (previously sold by Stampin’ Up!) to color her arms and legs.)

Next I stamped the “sand” using the stamp from High Tide that has the cut-out for the lighthouse.  I turned it upside down and inked only part of the stamp (to not include the cut-out portion) and stamped repeatedly in Sahara Sand ink.  I then used an Aqua Painter to blend in some of the areas.

Then I stamped the “water” using the tide stamp from High Tide repeatedly in Marina Mist.  I used a scrap piece of paper as a mask when stamping close to the girl.  You may want to stamp a true mask of the girl onto a scrap piece of paper, cut it out, and place it on top of the image on the card front if you want to be able to get the water closer to her image, but I like how mine came out — it looks like she is glowing.

I then used a sponge dauber and Soft Sky ink on the “sky” and down into the water to blend out the white.

The tufts of “grass” are also from the High Tide stamp set and are stamped in Wild Wasabi ink.

As for the “sun”, I had originally stamped it using the circle stamp from High Tide but then thought it needed something else.  I added Gold Wink of Stella (on retired list, but still available until 05/31/2017 or while supplies last) but that was too much.  So I opted to punch out a small scallop circle in Daffodil Delight Card Stock and cut it down to fit in the corner. The sun’s rays are the remnants of the Wink of Stella fiasco.

The Adirondack chairs are made using a die from the Seasonal Layers thinlits set and are attached using a Fine Tip Glue Pen at the base and Stampin’ Dimensionals behind both arms and in the middle plank at top of the back rest (cut down to tiny pieces).

Last but not least, the sentiment “just breathe.” is from the Colorful Seasons stamp set and — yes — is stamped on top of a portion of the chairs in Tuxedo Black Memento Ink.  Again, I cheated a bit here.  In order to get a good quality stamped image, a stamping platform was necessary.  As yet, one is not offered through Stampin’ Up! so I broke down and bought one.  It took about three stamps to get a good solid image.

To finish off the card, I wrapped some Linen Thread around the inside of the card about three times and tied a bow off to the right to give the card balance with the sun on the left.

It actually took me less time to create this card than it did to create this blog post.  If you would like to try and create this card but feel too intimidated to do it on your own, I would LOVE to join you for a day (or even just a few hours) of stamping fun.  Email me or call me to set a date!

Thank you for stopping by today.  I hope you leave here inspired to put stamps to ink to paper (and maybe do some watercoloring as well)!  Until next time, stamp on my friends.

Linda

Posted in Any Occassion, Big Shot, Cards, Techniques | Tagged , , , | 3 Comments

Creativity Starts Here with Paper Pumpkin

When you think of getting “crafty” do any of these statements sound familiar?

  • I want a creative escape, but I don’t have a lot of time.
  • I’m not sure I’m ready to commit to papercrafting, but I want to try it.
  • I love to create, but I don’t always feel creative.
  • I need some fresh project ideas.
  • How can I craft when I don’t have all the “crafting stuff” I need?

If you can identify with at least one of these statements, then this Paper Pumpkin promotion from Stampin’ Up! was inspired by you.

Paper Pumpkin says, “No more excuses!” because with our kits, you have everything you need in one box. You’ll get:

  • An expertly-designed project.
  • All the supplies to complete the project, pre-cut and ready to go.
  • Step-by-step instructions (including a video).
  • Something new and different every month.

Stampin’ Up! wants to make sure every NEW Paper Pumpkin customer can have the full Paper Pumpkin experience, so the Creativity Starts Here promotion is offering first-time subscribers an introductory 25% discount on June, July, and August 2017 kits. Not only will you like saving money, but you’ll also love starting a new creative journey. It has never been easier to skip to the fun!

Besides a great introductory discount, what are the other perks of having a Paper Pumpkin subscription?

  • The convenience of an all-inclusive kit arriving at your door every month.
  • Exclusive photopolymer stamp sets and the opportunity to build a collection.
  • Crafting time you can count on without a lot of prep work.
  • Trying new techniques.
  • Creating alternate projects with all the goodies in the box.
  • Getting together with friends to craft every month.
  • Purchasing past kits and refills so the fun never ends.
  • The quality of the products and variety of projects each month.
  • Sharing ideas with a community of online crafters.
  • The surprise factor!

THE FINE PRINT:

  • For first-time subscribers only.
  • Subscribers must join by Saturday, June 10, 2017; 11:50 PM (MT).
  • Available for month-to-month subscriptions, not prepaid subscriptions.
  • Discount applied to one kit per month for the first three months of a new subscription. After that, the price for each month’s kit will return to the regular price of $19.95 US/$26.95 CA.
  • Enter the promo code, STARTHERE, at PaperPumpkin.com to subscribe.

Contact me or sign up before June 10 to start receiving your three months of kits at a 25% savings.  I would be honored if you would select me as your demonstrator when you sign up for a subscription!

Thanks for stopping by today.  More posts to come real soon.  Until next time, stamp on my friends,

Linda

Posted in Paper Pumpkin, Products, Promotions | 1 Comment

Clearance Rack – Fresh New Savings

Spread the news!  Stampin’ Up! has just added new products to the Clearance Rack, with some discounted up to 60% off their original price.  Get these high-quality products while supplies last.  Once they are sold out, they are gone, gone, gone for good.

SHOP NOW

Until next time, stamp on my friends,

Linda

Posted in Clearance Rack, Products | Leave a comment

Bunny Buddies in a Crate

Happy Easter!  Spring is here (at least it is here in Texas) and April the giraffe had her baby (finally).  I will be headed to my Mom’s tomorrow for Easter lunch.  She will have a little Easter basket there waiting for me, just like she has every year since I was a small child.  When I think of Easter and my childhood, I remember the chocolate Palmer bunnies that we got every year.  We had to pace ourselves when eating them — an ear here, an ear there, then maybe a foot the next day and so on until finally there was nothing left.

As I mentioned many posts ago, one of the Paper Pumpkin kits – the March kit – was Easter themed.  I pulled it out this evening to put together some last minute gifts for my family:

Each bunny bag is filled with mini chocolate candy bars.  To help raise the bunny bags up out of the crate (sneak peek of a new framelit from the upcoming 2017-2018 Annual Catalog!), I put two mini bags of M&M’s in the bottom of the crate.

Here is my supply list of items that are available for purchase:

Thank you for stopping by.  I hope you and your family have a very Happy Easter.  Until next time, stamp on my friends.

Linda

Posted in Big Shot, Paper Pumpkin, Products | 2 Comments

Coming Soon to Gladewater, Texas

While on our road trip to Shreveport last weekend so I could attend Stampin’ Up! OnStage Local, my husband made some customer calls along the way.  (He is self-employed as a “food broker” which is kind of hard to explain, but simply put he represents numerous lines of food and beverage products as their “agent/representative” and sells their products to restaurants, etc.)  One such stop was to hand-deliver two tubs of ice cream to The Screen Door Antique Mall in Gladewater, Texas for their brand new ice cream bar in their antique shop.  I got the opportunity to meet Mark and Lola, the owners, and was tickled by how quickly the customers began streaming into the shop once word got out that the ice cream had arrived.

Before we left on our trip, my husband (whose name is Gary by the way), suggested I bring along some of my hand-made cards “just in case”.  So, while the men were talking, Lola and I talked about Stampin’ Up! and my cards and she asked if I would want to put some of my cards in her shop–which is just what I was going to ask her, and fortunately I already have card racks!

So, coming soon to The Screen Door in Gladewater, Texas, will be hand-made cards and paper crafts made by yours truly!  If you happen to be in the neighborhood, please drop in, look around and have some ice cream.  If you want to know more about what’s happening at The Screen Door, here is a link to their facebook page.

Thanks for stopping by today.  Until next time, stamp on my friends.

Linda

Posted in Cards | Leave a comment