Snowflake Sentiments and a Cable Knit Sweater

I am happy to report that while my hand is a little painful at times, that I am still able to hold my stamp blocks and crank the handle on my Big Shot so all is good in my world.  (Yay!)

Today’s project was inspired by a post by Catherine Brown, a Canadian demonstrator, who I believe got her inspiration from Tami White, a U.S. demonstrator in Massachusetts.  Here is my version of her card:

I made some modifications from Catherine’s card — my ribbon is different (since the Silver Satin ribbon is retired here in the U.S.), I added rhinestones to the centers of my silver snowflakes, I attached my cable knit sweater piece with dimensionals v. gluing it down flat and I added a snowflake to the sentiment piece.

Here are the Stampin’ Up! products that I used in the design of this card, all of which can quickly be added to your shopping cart by clicking on the thumbnails below:

Tips & Tricks:

Measurements:  Night of Navy cardstock = 5.25″ x 2.75″; Vellum = 5.25″ x 2.50″, Silver Foil = 5.25″ x 2.00″; Very Vanilla for Cable Knit Sweater = 5.25″ x 4.00″

When cutting the ruffled pieces (Night of Navy and Vellum) I cut both pieces at the same time and used small pieces of washi tape to keep them from moving.  This way the scallops match up perfectly.

When cutting the snowflakes and the ruffled pieces the points of the dies need to be touching the very top edge of the card stock so that you only cut off the top edges and leave the bottom lengths.

The Night of Navy and Vellum pieces are glued together with liquid glue that has been sponged onto the back of the vellum.  You could also use mini glue dots.  The silver snowflakes are glued onto the top of the scalloped piece with liquid glue.  If you have adhesive sheets, you could apply to the Silver Foil paper before you cut with the die.

The ribbon is wrapped around to the back and attached with Fast Fuse.  I took a separate piece of ribbon and pulled it through the ribbon on front and tied a bow.  I used mini glue dots to keep the from ribbon and bow in place.

The scalloped piece is then attached to the Cable Knit Sweater piece with liquid glue.  Use a lot of glue due to the nooks and crannies of the embossed paper.  You will need to hold it until it sets.  I then attached the panel to the card base with dimensionals.

I think that covers everything that may give you trouble, but if I missed anything let me know.  I am here to help you on your creative journey.

Thank you for stopping by today.  I hope you leave here inspired to put stamps to ink to paper.  Until next time, stamp on my friends.

Linda

Posted in Big Shot, Bundles, Cards, Christmas, Holiday Catalog | Tagged , , , | Leave a comment

Happy Owl-oween from Spooky Cat

Have you ever had one of those days where it seemed it would have been best if you had just stayed in bed with your head buried under the covers?  Well I think today was one of those days for me.

My day started about 4:30 AM – I couldn’t sleep and then I smelled something that indicated to me that my blind dog Rosie wasn’t able to get downstairs and out the doggie door quickly enough during the few hours I was actually asleep.  So there was that to deal with and afterwards I was not in the sleeping mood.

When I married my husband a little more than three years ago, I became a grandmother to Jayson who is 10 and about to turn 11.  He plays baseball and now football and of course he has both games on the same day.  Today’s games were at 10:45 AM and 1:30 PM, both in Frisco which is about 30-40 minutes from where we live depending on traffic.

Our usual routine is to stop at Einstein’s Bagels along the way for breakfast and Gary refills his large cup of joe to go.  We were about 10 minutes away from the baseball field when all of a sudden there was this blinding pain as a very hot liquid spilled all over my left leg.  Yes, you guessed it – as Gary was putting his coffee cup back down into the cup holder in the console it slipped out of his hand and flew into my lap – it was a full tall cup!  I soldiered on; sadly Jayson’s baseball team was defeated 14-7.  Also his football team was defeated 26-0.

So one would think that was enough for one day, but you would be wrong.  Our “puppy” Ella is sometimes more than I can manage on the leash and lately she has become very interested in hunting geckos and squirrels whenever we go out for our potty breaks.  This evening as I was preparing to take our three dogs out Ella lunged as I was opening the door causing me to smash my left hand / knuckles into the door.  I now have a couple of bloody knuckles, a very large bruise and a nice sized goose egg between my first and middle fingers.

So this very long explanation leads into today’s project.  I had extra pieces from yesterday’s card design (I had made extra just in case I messed up my first attempt) so I made some slight modifications to yesterday’s card design and came up with this:

It is supposed to appear as though the owl is wearing the sign around his neck.  Not sure I accomplished it though.  Instead of a leaf wreath in the upper right, I used the Patterned Pumpkins Thinlits dies and cut the pumpkin with the stars cutouts from vellum which is supposed to represent the moon.  Again, not sure I accomplished that look.

Here are the Stampin’ Up! products that I used in the design of this card, all of which can quickly be added to your shopping cart by clicking on the thumbnails below:

If you have any questions about any of the design elements of this card, do not hesitate to contact me.

I am not sure how much flexibility I will have in my hand tomorrow so if there is not a blog post, then you will know why.  Rest assured I will return to creating cards and other paper projects just as soon as possible.

Thank you for stopping by today.  I hope you leave here inspired to put stamps to ink to paper.  Until next time, stamp on my friends.

Linda

Posted in Cards, Halloween, Holiday Catalog, Techniques | Tagged , , , | Leave a comment

Give Thanks with Painted Harvest

I wanted to sponge another background for today’s project and had a partial design running around inside my head which included the branch thinlit from the Seasonal Layers dies and leaves.

I have always worked out my designs in real life, using the products I plan on using for the finished project.  Some people sketch out their designs on a piece of paper, while some work up a mock card using retired products.  How do you come up with your projects?  Do you just wing it like I do or do you sketch it up or do a test run?

Admittedly not all of my projects come out as I had imagined them in my mind.  Just keep in mind that it’s just paper and there are two sides so if you make a mistake on one side, just flip it over and try again.  Fortunately today’s project turned out better than I imagined.

In addition to sponging my background, I dry embossed the background with the Layered Leaves Dynamic Textured Impressions Embossing Folder.  I cut the branch out three times from Wood Textures Designer Series Paper and attached them to the front using the Fine-Tip Glue Pen.  Note that I started in the bottom left corner and stacked them to make it appear that they are attached to a tree trunk just off the edge out of view.  I used the Leaf Punch and Copper Foil Sheets to create the leaves which I cut off from the stems and added veins using my scoring tool and the silicon mat.  The leaves are attached to the branches with mini glue dots.  The upper right corner was empty space and I felt it needed something for balance so I made a leaf wreath using a 1/2″ circle of cardstock as my form.  The sentiment is tucked under the leaves and has one dimensional at the top and the bottom to hold in place.  I made the ribbon and bow by cutting the 5/8″ Burlap Ribbon in half.  I added a few extra leaves at the bottom of the sentiment oval just above the bow.

Here are the Stampin’ Up! supplies that I used in the design of the card, all of which can quickly be added to your shopping cart by clicking on the thumbnails below:

If you have any questions about the card design outlined above, please do not hesitate to contact me.

Thank you for stopping by today.  I hope you leave here inspired to put stamps to ink to paper.  Until next time, stamp on my friends.

Linda

Posted in Cards, Holiday Catalog, Techniques, Thanksgiving | Tagged , , , | Leave a comment

Crafting Forever … Creative Every Day

Crafting Forever – sounds perfect, right?  That is the name of the stamp set I selected for today’s card project.  This stamp set has some sentiments that are perfect for my view on life these days, i.e. “CRAFTING FOREVER!  HOUSEWORK NEVER.”  (My husband could definitely vouch for that sentiment!)

This stamp set requires some artistic touches to finish out your project.  I colored my stamped images with the soon to be released Stampin’ Blends – Stampin’ Up!’s new artist-quality alcohol based markers being offered in 12 of our exclusive colors (Bermuda Bay, Calypso Coral, Cherry Cobbler, Crumb Cake, Daffodil Delight, Night of Navy, Old Olive, Pink Pirouette, Pool Party, Pumpkin Pie, Rich Razzleberry and Smoky Slate, as well as Ivory, Bronze and a Color Lifter).

As a demonstrator I was able to get these as an early release (release period ends October 15).  The customer launch date is expected to take place before the end of the year.  Can’t wait until the customer launch date to get a set for yourself?  If you sign up to become a demonstrator before October 15 you can include the Stampin’ Blends as part of your starter kit!  Contact me for more information.

Here are the Stampin’ Up! products that I used in the design of this card, all of which (with the exception of the Stampin’ Blends) can quickly be added to your shopping cart by clicking on the thumbnails below:

If you have any questions regarding any of the design elements of this card, do not hesitate to contact me.

Thank you for stopping by today.  I hope you leave here inspired to put stamps to ink to paper.  Until next time, stamp on my friends.

Linda

Posted in Any Occassion, Cards | Tagged | Leave a comment

Thanks for Everything – All Things Thanks

I wanted to thank everyone who takes the time to visit my blog.  WordPress is so impressed by the activity they sent me a “thumbs up”!  Since I don’t have everyone’s home address to send each of you a card to thank you personally I thought I would make today’s project a thank you card.

If you are needing a stamp set for that perfect way to say “thank you” on a card, then the All Things Thanks stamp set is just what the doctor ordered.  This card was quick and easy and actually came together in my designer mind in no time.

Here are the Stampin’ Up! products that I used in the design of this card, all of which can quickly be added to your shopping cart by clicking on the thumbnails below:

If you have any questions regarding any of the design elements of this card, do not hesitate to contact me.

Thank you for stopping by today (and I hope you are enjoying your visits when you do drop in).  I hope you leave here inspired to put stamps to ink to paper.  Until next time, stamps on my friends.

Linda

Posted in Cards, Thank You | Tagged | 1 Comment

Breast Cancer Awareness Month – Ribbon of Courage

October is not just about pumpkins, ghosts, goblins, black cats and trick or treat.  For more than 30 years, October has been synonymous with “Pinktober” in honor of Breast Cancer Awareness.  If you watch professional football, then you have seen the players wearing pink cleats, pink sweatbands, pink socks and/or pink towels on their waists.  If you are a breast cancer survivor or the friend and family member of one, then you most likely have participated in one or more of the “Susan G. Komen 3-day Race for the Cure” events.

I wanted to take a moment and create a special card in honor of Breast Cancer Awareness and had the perfect bundle of products to work with from the 2017-2018 Annual Catalog by Stampin’ Up!  As I have commented before, this particular stamp set – Ribbon of Courage – was designed by Patty Bennett after she reached $1,000,000.00 (that’s ONE MILLION DOLLARS) in career sales as a Stampin’ Up! demonstrator!

The cancer ribbon, flowers and leaves were all cut using the Support Ribbon Framelits dies that coordinate with the Ribbon of Courage stamp set.  I may have gone a little overboard on this card (I likely could have used just one of the flowers), but I’m not really a “less is more” kind of person.

You really cannot tell from the photos, but I cut the flower in both Blushing Bride and Whisper White cardstock and layered them using dimensionals, offsetting the petals slightly.  I also curled the flowers with my bone folder.

Here are the Stampin’ Up! products that I used in the design of this card, all of which can quickly be added to your shopping cart by clicking on the thumbnails below:

If you have any questions regarding any of the other design elements of this card, do not hesitate to contact me.

Thank you for stopping by today.  I hope you leave here inspired to put stamps to ink to paper.  Until next time, stamp on my friends.

Linda

Posted in Bundles, Cancer Awareness, Cards | Tagged , | Leave a comment

World Card Making Day Celebration

My apologies for not posting for the last few days. I have been spending all of my time preparing for my Open House in celebration of World Card Making Day which was held on Saturday, October 7.

I had so much fun and made some new friends.  I can’t wait to schedule my next event. If you couldn’t make it this time, I hope to see you at one of my future events!

Thank you for stopping by today. I hope you leave here inspired to get creative. No such thing as “I don’t have a creative bone in my body” … you just need to have the right tools and someone to show you how to use them. I am here to help!

Until next time, stamp on my friends.

Linda

P.S.  A special THANK YOU to Katherine Cameron, Pat Ibarra, Marlene Bashore and Ariellen for sharing their day with me.

Posted in Cards | Leave a comment

Hearts Come Home Hometown Village

I did more sponging today to create the background for my project.  It is a messy task to undertake and reminds me a lot of finger painting when I was a kid, just with sponges.  No matter how careful I try to be though, I still get ink up under my fingernails.

Today’s sponging was to create a skyline for the village I was going to create using the Hometown Greetings Edgelits dies that coordinate with (and can be purchased as part of a bundle) the Hearts Come Home stamp set.

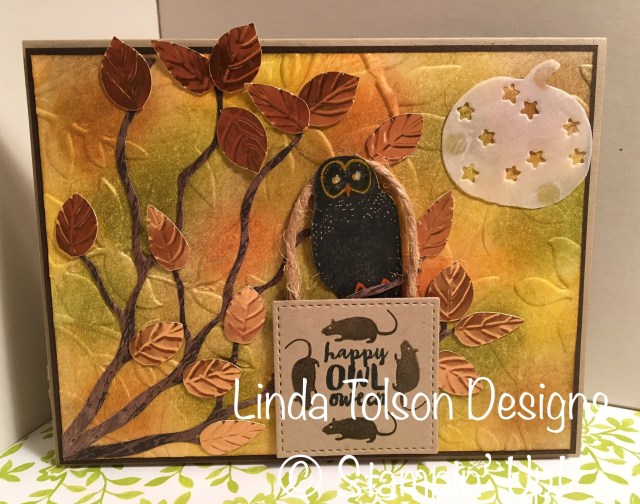
I need to remember to walk away and let my sponged paper “rest” for a bit before I continue on with my creative process.  The once distinctive shades of the three ink colors I used faded once dried completely.  I would have liked to have had more contrast and likely would have added more of the darker shade before continuing with the project.  (You learn something new everyday, or so I hear.)

When using the edgelits you will want to make sure that you place the roof tips at the very top of your paper so that you have a “snow bank” at the bottom long enough to allow you to space out your village layers.  The bottom layer is adhered flat to the cardstock, the middle silver foil and the top whisper whiter layers are attached with dimensionals.  The sentiment is heat embossed in Silver embossing powder on the snow bank of the top edgelit cut (you will want to heat emboss this piece before you attach it to the card).

Here are the Stampin’ Up! products that I used in the design of this card, all of which can quickly be added to your shopping cart by clicking on the thumbnails below:

If you have any questions regarding any other design elements of this card, do not hesitate to contact me.

Thank you for stopping by today.  I hope you leave here inspired to put stamps to ink to paper.  Until next time, stamp on my friends.

Linda

Posted in Cards, Christmas, Holiday Catalog, Techniques | Tagged , , | Leave a comment

Joy to the World from Hearts Come Home

Have you ever started on a project with one thing in mind and ended up with something completely different?  Well that was me today.  I wanted to make a Joseph’s Coat technique card, but using Christmas colors and a Christmas stamp set.  I cut my card stock and selected my ink colors, dipped my sponges and went to work coloring.

The longer the sponged piece of cardstock sat on my desk, the more vibrant it became and I really hated the idea that I was going to be covering up so much of the colors soon.  Nevertheless, I then stamped various images in Versamark and heat embossed with clear embossing powder.  I decided to try Soft Suede as the color to brayer over the entire piece but it just wasn’t dark enough and I really wasn’t liking the way I had stamped the images.  So that first attempt went into the trash can.

I then started over with the sponging.  Of course, it didn’t look as good as the first one did, but then again the longer I let it sit, the richer the colors became.  So instead of a Joseph’s Coat card, here is what I came up with:

Another oops I made was that I attempted to heat emboss the sentiment directly onto the sponged cardstock; however, you really could not see it.  So, I did it a second time on whisper white.  Wow – this project was a labor of love, but I think it turned out pretty cool.  What do you think?

Here are the Stampin’ Up! products that I used in the design of this card, all of which can quickly be added to your shopping cart by clicking on the thumbnails below:

If you have any questions regarding any of the design aspects of this card, do not hesitate to ask.

Thank you for stopping by today.  I hope you leave here inspired to put stamps (and sponges!) to ink to paper.  Until next time, stamp on my friends.

Linda

Posted in Cards, Christmas, Holiday Catalog, Techniques | Tagged | Leave a comment

A Deer on a Snowflake

I really love the Merry Patterns stamp set that is a limited edition host set through the end of October.  It’s hard to pick a favorite image from this set, but the deer is right up there.  I mean, come on, a deer wearing a sweater is just too darn cute!  I wanted to draw attention to that sweater on today’s card, so I stamped the deer in two different colors and then fussy cut the sweater and glued it on the deer which I also fussy cut.

I had to do some serious fussy cutting on the deer – I didn’t like the white border that was on the one on my project yesterday.  Not an easy task around the antlers so in the areas where I just could not get down in there with my snips I took out my Soft Suede Stampin’ Write Marker and covered up the white spots.  This resulted in some darker areas on the deer which I kind of like – after all, they are not uniformly the same color all over, right!

Here are the Stampin’ Up! products that I used in the design of this card, all of which can quickly be added to your shopping cart by clicking on the thumbnails below:

If you have any questions regarding any of the design elements of this project, do not hesitate to contact me.

Thank you for stopping by today.  I hope you leave here inspired to put stamps to ink to paper.  Until next time, stamp on my friends.

Linda

Posted in Cards, Christmas, Holiday Catalog | Tagged | Leave a comment